StandardProjectWizard.zip
17 KB
If you want to add your own template into the New Project dialog, you first have to create a corresponding *.template file. This template must then be copied into the Templates folder below the Automation Platform installation root. The file format itself is an XML file.
Let's take a look at the following template example:
<ProjectTemplate>
 <Name>
  <DefaultString>Sample template</DefaultString>
  <LocalizedString Culture='de-DE'>Beispielvorlage</LocalizedString>
  <LocalizedString Culture='fr'>………</LocalizedString>
 </Name>
 <Folder>
  <DefaultString>Northwind Inc.\MXT 3000</DefaultString>
 </Folder>
 <Description>
  <DefaultString>A project for the MXT 3000</DefaultString>
 </Description>
 <Icon>
  <Path>MXT3000.ico</Path>
 </Icon>
 <DefaultFileName>
  <DefaultString>Untitled</DefaultString>
  <LocalizedString Culture='de-DE'>Unbenannt</LocalizedString>
  <LocalizedString Culture='ar-SA'>Bopomofo</LocalizedString>
 </DefaultFileName>
 <Extension>.project</Extension>
 <TemplatePath>..\Temp
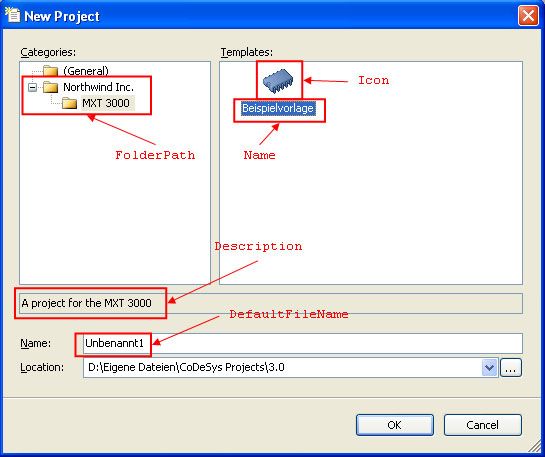
And this is how this template will affect the appearance of the New Project dialog, provided that the MXT3000.ico file path is present relatively to the template file itself.
Please note that you can localize the template file is to different UI languages; in the above screenshot, the German text specifications are displayed.
If the user confirms the displayed dialog, a copy of the file located at ..\Templates\SampleTemplate.project (this path is also relative to the template file itself and must of course also be installed along with the template file) will be created with the specified name in the specified location, and then opened for editing without any further user interaction.
For full reference information about the template files, please refer to the attached XSD schema.
While the above template simply creates a copy of an existing master project, there is also the possibilty to display a wizard dialog where the user can configure the new project interactively. This can be realized by adding some code into an Automation Platform plug-in that is responsible for displaying the dialog and then building the project programmatically using the values that has been entered into that dialog.
The template file for a wizard is pretty much the same as that one mentioned above. The only difference is that the TemplatePath element is replaced by a Wizard element. That element contains the type GUID of a class that implements the _3S.CoDeSys.Core.Objects.IProjectWizard interface.

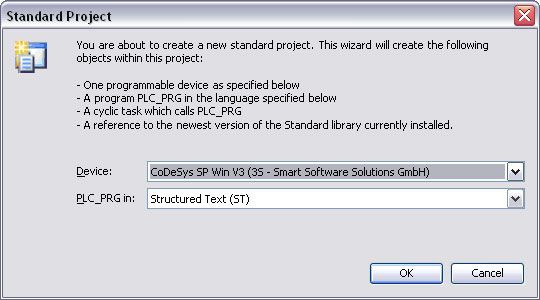
For an example, I have simply cut the code for the Standard project wizard which is well-known for most CoDeSys users. (I have changed the type GUID of the plug-in class so that there is no danger of any conflicts.) Here is the wizard:
When you take a look at the source code, you can learn lots of useful things:
When using the sample code in any serious development, please make sure that you exchange all type GUIDs and the plug-in GUID by GUIDs generated on your machine.
17 KB
4 KB